In this article I describe the parameters used in the shaped kiteskin generator program listed in the Parametric Kite Design article. The skin layout generated by that program:
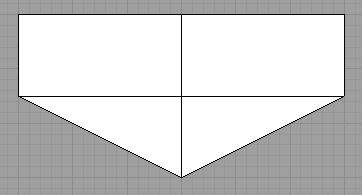
The skin is displayed as a top view, with the leading edge down. This is generated using the following parameters (this is not the parameter set used on the FoilNose2 kite):
tw = 3  # - tip width
sa = 45 # - start angle (degrees)
nc = 6  # - notch count
nd = 60 # - notch depth % (controls LE/TE ratio)
tc = 8  # - TE concavity (degrees)
tl = 50 # - TE length
A description of each parameter:
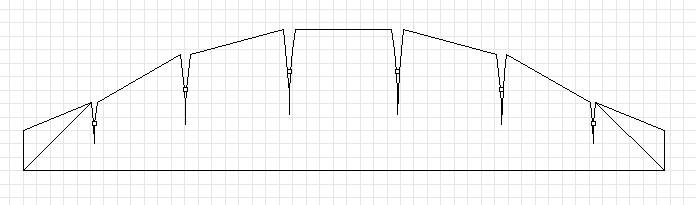
Tip Width
This parameter determines the 'height' (width) of the tips.
The measurement shown in red is three units.
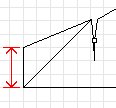
Start Angle
The start angle controls the angle of the first trailing edge section from the front pigtails to the first notch. This is the line shown inside the actual trailing edge.
The start angle measurement shown in the picture is 45°. The kite is drawn as if it was a two line kite, and the rear tip section is added on via the tip width specification. The actual trailing edge is from the rear of the tip to the first notch.
Notch Count
Notch count is the number of notches used to shape the fabric. There are 6 notches shown in the example.
These notches are
symmetric around the Y axis. Folding the fabric flat along the center of the notch and sewing along the line creates the 3 dimensional surface.
The number of fabric 'sections' is one more than the notch count.
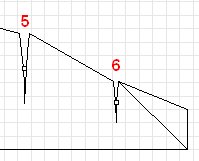
Notch Depth
Each notch starts at the traling edge and cuts a percentage of the way to the leading edge.
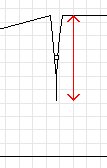
Shown here is a notch which cuts 60% of the way to the leading edge. In this version of the program, each notch cuts the same percentage of the way to the leading edge.
The "box" displayed in the center of the notch is the control point for the cubic Bézier curve used for the notch wall. Since the control point is the same for each side of the wall, the generated 3D surface generated by sewing the notch smoothly blends in with the rest of the canopy fabric.
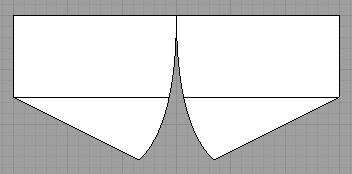
Trailing Edge Concavity
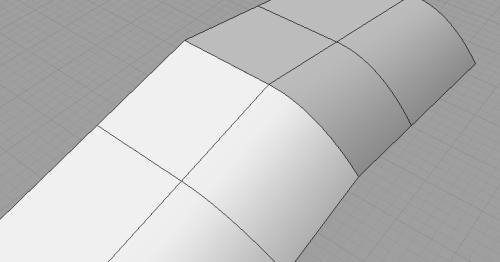
It is necessary for a single skin kite to have no unsupported convex edges. Otherwise these edges would flap (if on the trailing edge) or fold (if on the leading edge). The trailing edge concavity parameter controls the overall concavity of the trailing edge.Below is a rendering of a sewn notch, leading edge at top / left, trailing edge at bottom / right.
This rendering shows a ridge from the leading to the trailing edge where the two panel sections meet. The physical kite will not have this ridge, but it might have wrinkles indicating stress distortions when too few notches are used to approximate a smooth 3D shape.
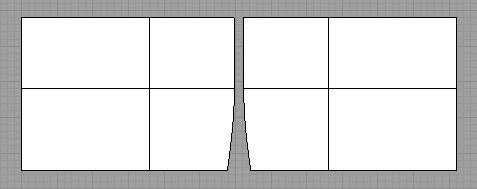
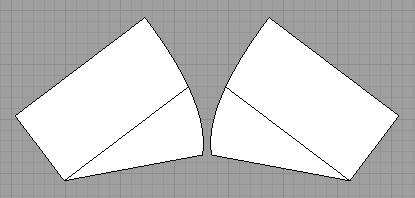
Let's take this apart to see what the individual panels look like. Below is the flat outline of the panels used to create the image above. The leading edge is at the top and the trailing edge at the bottom. We can see that if we sew the panels togeter, the leading edge will be straight, as if the notch never existed.
What happens to the trailing edge when the panels are sewn together? Below the panels are rotated so that the trailing edge sewing lines match.
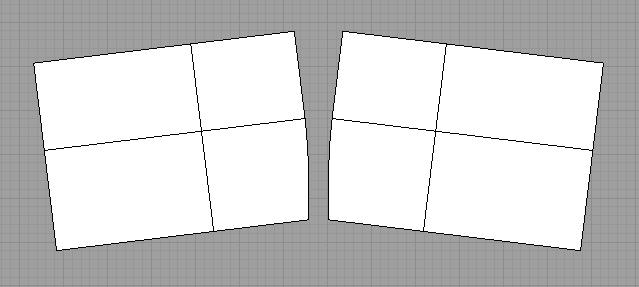
From this we see that the trailing edge becomes concave when the notch is sewn. This is the simple case where the leading edge is parallel to the trailing edge. This also works when making a notch at a trailing edge 'corner' where two TE sections meet to form a convex angle. See the below three pictures:
Shown below is a kiteskin with the leading edge at the top and the trailing edge at the bottom. Note the trailing edge which has a convex point where the two sides of the trailing edge meet to form an angle. The second picture shows a notch at the center of the trailing edge.
Below is the kiteskin rotated to show the connection where the trailing edge meets when sewing the notch. Note that the trailing edge is now concave.
The above three pictures is a simplified example where only one notch is used. This also applies to multiple notches and differing trailing edge shapes. The key point is that a notch can be used to keep all edges concave and impart a 3D shape to the kite skin.
Sewing notches into the fabric can produce a concave angle in the fabric where the edges join to form a continuous edge. The code performs the notch calculation to make a notch creating a concave intersection where there would otherwise be a concave corner without the notch.
A positive value for trailing edge concavity will result in the notches creating a concave edge when sewed together. The value is divided equally between each notch. E.g. 12° of concavity divided by 4 notches would give 3 degrees of concavity for each notch.
Trailing Edge Length
In between the notches is the trailing edge. This parameter determines the overall length of the trailing edge of the kite. From the perspective of this measurement, the first TE segment is considered to be from the front pigtails to the first notch. See the description of the "start angle" parameter.The length of the leading edge is not defined as a parameter. It is a result of the values used for the set of parameters (above) used to specify the kite skin. If the designer is looking for a specific ratio between the leading and trailing edges, the parameter set must be adjusted to generate this.
Conclusion
This article describs the parameters this particular program uses to generate a pattern suitable for single skin kites and hybrids. However, the design theory behind why this works still needs to be described.This theory is hinted at in the Parametric Kite Design article's enigmatic claim: "the combination one necessary condition and one key value helps determine if the kite will fly. The necessary condition is that there are no unsupported (e.g. unbridled) convex sections on the (3D) outline of the kite. The one key value is the ratio between the length of the leading edge and trailing edge of the kite". This certianly needs further elaboration. I hope to do this in my next article in this series.
Related pages:
Parametric Kite Design
FoilNose2